Cisco ASA 8.4 enable logging, Syslog Server

If you wish to log to the console, you can use the logging console command.

This table shows you the levels of logging available:

 <0-7>          Enter syslog level (0 - 7)
  WORD           Specify the name of logging list
  alerts         Immediate action needed           (severity=1)
  critical       Critical conditions               (severity=2)
  debugging      Debugging messages                (severity=7)
  emergencies    System is unusable                (severity=0)
  errors         Error conditions                  (severity=3)
  informational  Informational messages            (severity=6)
  notifications  Normal but significant conditions (severity=5)
  warnings       Warning conditions                (severity=4)

If you wish to use a syslog server, the very excellent visual syslog is free and open source, and works well.  http://maxbelkov.github.io/visualsyslog/

It uses the default port 514

From the config prompt, use the logging host command.

Use logging trap to set the level.  If you use level 7, you will find ASA is too verbose.

IPSEC VPN ASA 8.4+

Sample configuration below.

ipsecvpnproject


All routers must be configured with default gateways, using ip route 0.0.0.0 0.0.0.0 <next hop> for it to work.

Here’s a sample configuration from http://www.soundtraining.net/i-t-tutorials/cisco-tutorials/47-cisco-asa-site-to-site-vpn-configs, an excellent training company, which produces some first rate free videos, including this one:  https://www.youtube.com/watch?v=sIbi_bYb2k4

Excellent book:  http://www.amazon.com/dp/1449596622/ref=cm_sw_su_dp

NOTE:  IP addresses need to be changed.

ASA01

Step 1:  Define your local and remote networks.  (Net-local is just a text string)

object network net-local
subnet 192.168.101.0 255.255.255.0
object network net-remote
subnet 192.168.102.0 255.255.255.0
exit

Step 2:  Create an ACL to permit traffic from ASA2’s inside subnet

access-list outside_1_cryptomap permit ip 192.168.101.0 255.255.255.0 192.168.102.0 255.255.255.0
exit

Step 3:  Create a tunnel-group to the OUTSIDE INTERFACE of the partner ASA

tunnel-group 192.168.0.12 type ipsec-l2l <Note – that’s not 121, it’s eltoel (lantolan)>
exit

Step 4: Set up the ISAKMP attributes
tunnel-group 192.168.0.12 ipsec-attributes
pre-shared-key pass1234
isakmp keepalive threshold 10 retry 2
exit

Step 5: Enable isakmp encryption on outside interface
crypto isakmp enable outside

Step 6: Create ISAKMP policy – this is for the key exchange between the two firewalls.

crypto isakmp policy 10 authentication pre-share
crypto isakmp policy 10 encrypt 3des
crypto isakmp policy 10 hash sha
crypto isakmp policy 10 group 2
crypto isakmp policy 10 lifetime 86400

**************End of phase 1********************************

Step 7: Create transform set
crypto ipsec transform-set ESP-3DES-SHA esp-3des esp-sha-hmac
<ESP means  – encapsulating security payload, HMAC means hashing message authentication code>
crypto map outside_map 1 match address outside_1_cryptomap
<outside_1_cryptomap was the ACL defined above>
crypto map outside_map 1 set pfs group1
crypto map outside_map 1 set peer 192.168.0.12
crypto map outside_map 1 set transform-set ESP-3DES-SHA
crypto map outside_map interface outside

Step 8: Configure non-nat and a default gateway route

nat (inside,outside) 1 source static net-local net-local destination static net-remote net-remote <This line stops traffic for the partner subnet going on to the internet, and forces it in to the tunnel instead>
route outside 0 0 192.168.0.1

ASA02

object network net-local
subnet 192.168.102.0 255.255.255.0
object network net-remote
subnet 192.168.101.0 255.255.255.0
access-list outside_1_cryptomap permit ip 192.168.102.0 255.255.255.0 192.168.101.0 255.255.255.0
tunnel-group 192.168.0.11 type ipsec-l2l
tunnel-group 192.168.0.11 ipsec-attributes
pre-shared-key pass1234
isakmp keepalive threshold 10 retry 2
crypto isakmp enable outside
crypto isakmp policy 10 authentication pre-share
crypto isakmp policy 10 encrypt 3des
crypto isakmp policy 10 hash sha
crypto isakmp policy 10 group 2
crypto isakmp policy 10 lifetime 86400
crypto ipsec transform-set ESP-3DES-SHA esp-3des esp-sha-hmac
crypto map outside_map 1 match address outside_1_cryptomap
crypto map outside_map 1 set pfs group1
crypto map outside_map 1 set peer 192.168.0.11
crypto map outside_map 1 set transform-set ESP-3DES-SHA
crypto map outside_map interface outside
nat (inside,outside) 1 source static net-local net-local destination static net-remote net-remote
route outside 0 0 192.168.0.1

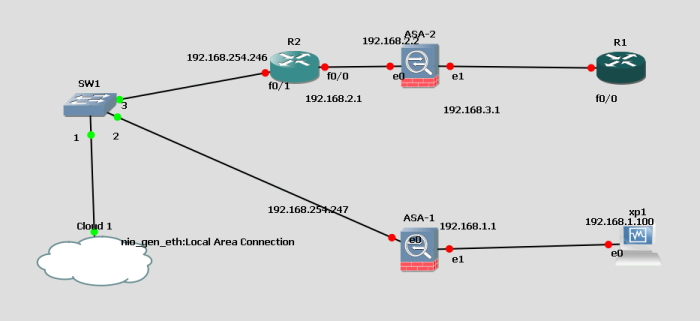
This needs to be edited to match the diagram above.

In general, IPSEC ISAKMP involves two stages:

Stage 1:  The key exchange and handshake
Stage 2: The actual setting up of the tunnel.


BFE repair

Cannot install Avast because BFE service not running.  This is sometimes disabled by a virus or malware.  Check if the service is running, and try to restart it.  If you get permission issues or it’s missing, there are two files here:  Http://mail.vmi.co.uk/bferepair.zip which will fix the problem.  Start with the registry file first.  (Note:  Registry file is W7 only).


Remote shutdown and reboot: Windows

Shutting down a computer remotely.  If you are not logged in to the terminal as an admin for the remote machine, open the command prompt and type (without the quotes):

“runas /U:UserNameGoesHere CMD” and enter the password when prompted. Then try the command from the newly presented CMD Box.

You can then run the remote shutdown command

shutdown /r /f /m \\COMPUTERNAME

ICND1: SSH using Packet Tracer

Sample configuration, setting up SSL to connect to a switch

ssh

This configuration applies when you get a new router, and want to create SSH connectivity, so that you don’t need to connect via the console cable.

Step 1.  Create a management VLAN and assign it an ip address, so you can connect via IP

vlan 10
exit
int vlan 10
ip address 192.168.1.1 255.255.255.0
no shut

exit

int fa0/1
switchport mode access
switchport access vlan 10

You should now be able to ping from the PC to the switch.

Step 2.  Configure hostname, domain name, local user, enable password and password encryption

hostname router1
ip domain-name test.com
username steve privilege 15 password happy
enable password veryhappy
service password-encryption

Step 3. Generate crypto keys.

crypto key generate rsa

You are prompted for modulus size. 1024 bits is probably ok.


Step 4. Line vty set up:

# line vty 0 4
(config-line)# transport input ssh
(config-line)# login local
(config-line)# exit

Step 5. Do the same for the console

# line console 0
(config-line)# logging synchronous
(config-line)# login local

Step 6.  Connect using the command line on the virtual PC  (Command is non standard, in real life  you would use PuTTY or similar)

ssh -l steve 192.168.1.1


ICND1: ACL syntax

ACLs can block or allow traffic, in or out, based on protocol, mask , ip source and destination.

Basic facts:  (See Computer Networking Notes website , an excellent source of information on cert level technologies), for more.


  • ACLs come in two varieties:Numbered and named
  • Each of these references to ACLs supports two types of filtering: standard and extended.
  • Standard IP ACLs can filter only on the source IP address inside a packet.
  • Whereas an extended IP ACLs can filter on the source and destination IP addresses in the packet.
  • There are two actions an ACL can take: permit or deny.

Extended ACL syntax:

Access-list <number 100-199> <permit | deny> <protocol> <source> < sourcemask>
<operator source port> < destination> <destination-mask> < operator
destination port> <options> < log>

Useful notes:

  1. Protocol:  IP, TCP, UDP, ICMP, GRE and IGRP. TCP,
    UDP and ICMP
  2. Source ip address, or could be any
  3. Wildcard mask is inverse mask:  0 = care, 255=don’t care.  See incredibly useful easy to remember subnetting table for more on this.
  4. operator source port and operator destination port:  lt, gt, eq, neq (less than, greater than, equal, not equal) and a port number

More from this incredibly useful site:  Sans.org  http://www.sans.org/reading-room/whitepapers/networkdevs/easy-steps-cisco-extended-access-list-231


ICND1: VTP and DTP

VTP is Vlan Trunking Protocol.  Cisco proprietary.

Purpose:  To enable the automatic configuration of VLANS in a switch.  Once one switch is configured as a server, the client will create all VLANS on the server.

VTP Modes:  Server, client, transparent.

Server:  Set up VTP server and VLANS will propagate to clients. Server sends out VTP advertisements.
Client: Receives advertisements and updates VLAN database
Transparent: Forwards VTP advertisements but does not update database.

VTP pruning: VTP broadcasts only if switch on receiving end has ports in that VLAN.

====================================================================

DTP is Dynamic Trunking Protocol. Cisco Proprietary

Purpose:  To dynamically form trunks with other Cisco Switches

The DTP is used by Cisco switches to negotiate whether an interconnection between two switches should be put into access or trunk mode. It is meant both to ease the initial deployment of a switched network and to minimize configuration errors that result from mismatched port configuration on an interconnection between two switches.

The DTP helps to automatically negotiate whether the port should be put into access or trunk mode and what trunking protocol (802.1Q or ISL) should be used. The individual DTP modes are:

  • dynamic auto – the port will negotiate the mode automatically, however, it prefers to be an access port
  • dynamic desirable – the port will negotiate the mode automatically, however, it prefers to be a trunk port

DTP datagrams are also sent if the port is set statically to the trunk mode. However, if the port is set statically to the access mode, both sending and processing DTP datagrams on that port is deactivated.

The individual combinations of port settings lead to following results:

  • dynamic auto + dynamic auto = access
  • dynamic auto + dynamic desirable = trunk
  • dynamic desirable + dynamic desirable = trunk
  • dynamic auto or dynamic desirable + trunk = trunk
  • dynamic auto or dynamic desirable + access = access