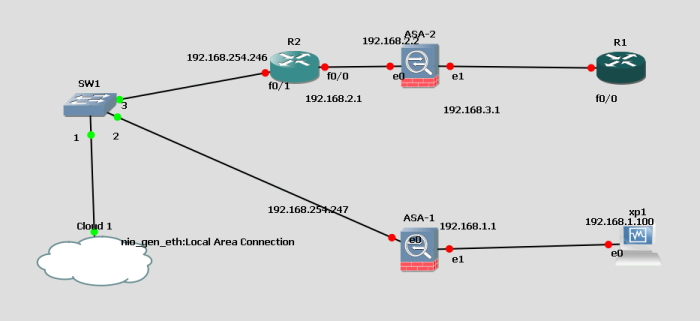
Sample configuration below.

All routers must be configured with default gateways, using ip route 0.0.0.0 0.0.0.0 <next hop> for it to work.
Here’s a sample configuration from http://www.soundtraining.net/i-t-tutorials/cisco-tutorials/47-cisco-asa-site-to-site-vpn-configs, an excellent training company, which produces some first rate free videos, including this one: https://www.youtube.com/watch?v=sIbi_bYb2k4
Excellent book: http://www.amazon.com/dp/1449596622/ref=cm_sw_su_dp
NOTE: IP addresses need to be changed.
ASA01
Step 1: Define your local and remote networks. (Net-local is just a text string)
object network net-local
subnet 192.168.101.0 255.255.255.0
object network net-remote
subnet 192.168.102.0 255.255.255.0
exit
Step 2: Create an ACL to permit traffic from ASA2’s inside subnet
access-list outside_1_cryptomap permit ip 192.168.101.0 255.255.255.0 192.168.102.0 255.255.255.0
exit
Step 3: Create a tunnel-group to the OUTSIDE INTERFACE of the partner ASA
tunnel-group 192.168.0.12 type ipsec-l2l <Note – that’s not 121, it’s eltoel (lantolan)>
exit
Step 4: Set up the ISAKMP attributes
tunnel-group 192.168.0.12 ipsec-attributes
pre-shared-key pass1234
isakmp keepalive threshold 10 retry 2
exit
Step 5: Enable isakmp encryption on outside interface
crypto isakmp enable outside
Step 6: Create ISAKMP policy – this is for the key exchange between the two firewalls.
crypto isakmp policy 10 authentication pre-share
crypto isakmp policy 10 encrypt 3des
crypto isakmp policy 10 hash sha
crypto isakmp policy 10 group 2
crypto isakmp policy 10 lifetime 86400
**************End of phase 1********************************
Step 7: Create transform set
crypto ipsec transform-set ESP-3DES-SHA esp-3des esp-sha-hmac
<ESP means – encapsulating security payload, HMAC means hashing message authentication code>
crypto map outside_map 1 match address outside_1_cryptomap
<outside_1_cryptomap was the ACL defined above>
crypto map outside_map 1 set pfs group1
crypto map outside_map 1 set peer 192.168.0.12
crypto map outside_map 1 set transform-set ESP-3DES-SHA
crypto map outside_map interface outside
Step 8: Configure non-nat and a default gateway route
nat (inside,outside) 1 source static net-local net-local destination static net-remote net-remote <This line stops traffic for the partner subnet going on to the internet, and forces it in to the tunnel instead>
route outside 0 0 192.168.0.1
ASA02
object network net-local
subnet 192.168.102.0 255.255.255.0
object network net-remote
subnet 192.168.101.0 255.255.255.0
access-list outside_1_cryptomap permit ip 192.168.102.0 255.255.255.0 192.168.101.0 255.255.255.0
tunnel-group 192.168.0.11 type ipsec-l2l
tunnel-group 192.168.0.11 ipsec-attributes
pre-shared-key pass1234
isakmp keepalive threshold 10 retry 2
crypto isakmp enable outside
crypto isakmp policy 10 authentication pre-share
crypto isakmp policy 10 encrypt 3des
crypto isakmp policy 10 hash sha
crypto isakmp policy 10 group 2
crypto isakmp policy 10 lifetime 86400
crypto ipsec transform-set ESP-3DES-SHA esp-3des esp-sha-hmac
crypto map outside_map 1 match address outside_1_cryptomap
crypto map outside_map 1 set pfs group1
crypto map outside_map 1 set peer 192.168.0.11
crypto map outside_map 1 set transform-set ESP-3DES-SHA
crypto map outside_map interface outside
nat (inside,outside) 1 source static net-local net-local destination static net-remote net-remote
route outside 0 0 192.168.0.1
This needs to be edited to match the diagram above.
In general, IPSEC ISAKMP involves two stages:
Stage 1: The key exchange and handshake
Stage 2: The actual setting up of the tunnel.